Git for Vibe Coders
Version control is your essential safety net — your "save game" system that lets you experiment fearlessly, review every AI-generated change, and instantly undo any mistake.
Learn by doing: Before diving in, spend 30 minutes with Learn Git Branching — an interactive, visual tutorial that runs in your browser. The muscle memory will save you hours later.
Quick reference: Need a command fast? Hit ⌘K to search, or open the Git Cheat Sheet from the header for a complete command reference.
What Is Git?
Git is a version control system — software that tracks every change you make to your code and lets you travel back in time to any previous version. Think of it like an unlimited undo history for your entire project, not just a single file.
If you're using AI tools like Copilot, Cursor, or Claude to write code, Git becomes even more critical. AI can generate hundreds of lines in seconds — some brilliant, some broken. Without Git, a bad AI suggestion could overwrite your working code with no way back. With Git, you can:
- Review every AI change before it becomes permanent
- Undo any mistake instantly — whether it's yours or the AI's
- Branch to experiment in a safe sandbox without risking stable code
- Collaborate with teammates by sharing code through a structured review process
Git was created in 2005 by Linus Torvalds (the creator of Linux) and is used by virtually every software team in the world. Learning it is non-negotiable if you want to write code professionally — with or without AI.
Installing Git
Before anything else, you need Git on your machine. Pick your operating system:
The easiest way is to install the Xcode Command Line Tools, which include Git. Open Terminal and run:
$ xcode-select --installA dialog will pop up asking you to install. Click Install and wait a few minutes.
Alternatively, if you use Homebrew:
$ brew install gitTo confirm Git is installed, open a terminal and run:
$ git --version
git version 2.44.0
If you see a version number, you're ready to go. The exact number doesn't matter much — anything 2.30+ is fine.
What Is a Repository?
A repository (or "repo") is simply a project folder that Git is tracking. Inside it, Git maintains a hidden .git folder that stores the entire history of every file — every change, by whom, and when.
There are two kinds of repositories you'll work with:
Local Repository
The copy on your own computer. You make changes, stage them, and commit them here. It's completely private until you decide to share.
Remote Repository
A copy hosted on a service like GitHub, GitLab, or Bitbucket. This is how you share code with teammates and keep a backup in the cloud.
The typical workflow is: you clone (download) a remote repo to your machine, make changes locally, then push (upload) your changes back. Git keeps both copies in sync.
Every change in Git goes through three stages — your Working Directory (where you edit files), the Staging Area (where you prepare a snapshot), and the Repository (where snapshots are permanently saved as "commits"). Don't worry if this sounds abstract — you'll see each step in action throughout this guide.
Enterprise Onboarding: Connecting to Your Codebase
1.1 First-Time Local Configuration
In an enterprise, traceability is paramount. Every commit must be tied to a specific individual. Using your correct enterprise name and email is non-negotiable.
git config --global user.name "Your Name"
git config --global user.email "your-enterprise-email@company.com"--global flag saves this for every Git repository on your computer. You only need to do this once.Don't want to use the terminal? No problem. VS Code will actually prompt you to configure your identity the first time you try to use Git. You can also open the Command Palette (Cmd+Shift+P) and search for "Git: Config" to set these values without touching the terminal.
"Set up my Git config with my name and email for this project"
"Configure Git to use VS Code as my default editor"
1.2 Authentication with Personal Access Token
- Go to GitHub Settings → Developer settings → Personal access tokens
- Click Generate new token (classic)
- Name it descriptively (e.g., "Work Laptop")
- Set an expiration (90 days recommended)
- Select scopes:
repoandread:org - Click Generate token and copy it immediately
git clone https://github.com/Your-Enterprise/your-project.git
# Username: your-github-username
# Password: your-personal-access-token
Storing Your Credentials
# macOS - Store in Keychain (recommended)
git config --global credential.helper osxkeychain

# Windows - Use Windows Credential Manager
git config --global credential.helper manager

# Linux - Store in encrypted file
git config --global credential.helper libsecretThat said, if you're using VS Code, you can skip the PAT setup entirely. VS Code handles GitHub authentication for you -- when you clone a private repo or push for the first time, it opens your browser to sign in. No tokens to generate, copy, or store:

"Help me set up SSH authentication for GitHub"
"Generate an SSH key and add it to my GitHub account"
1.3 The First Pull (Cloning the Repository)
To get a copy of the project on your machine, run the clone command with the repository URL your team shared with you:
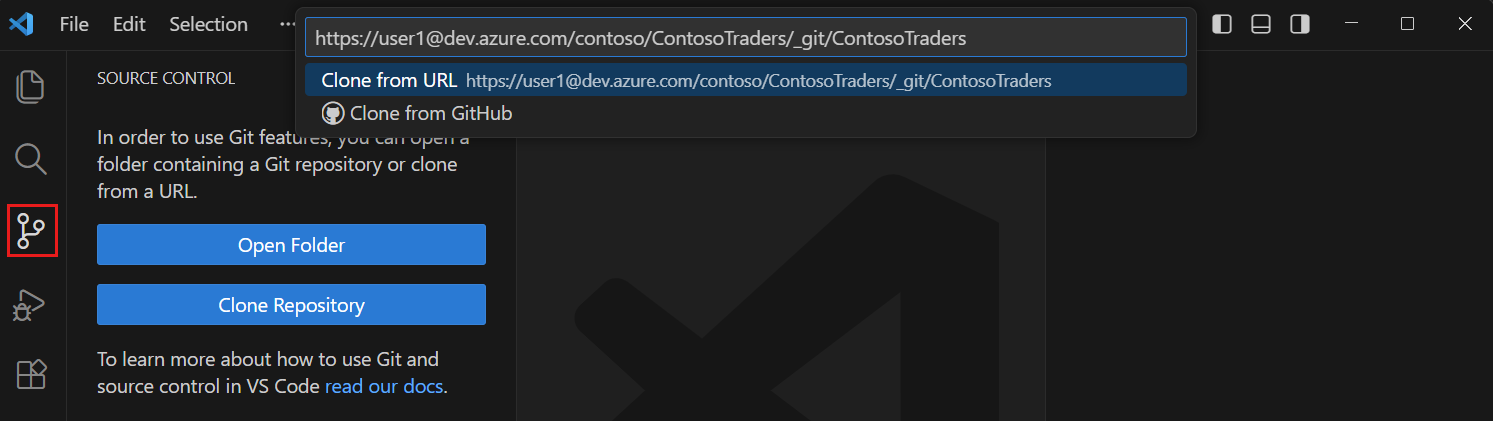
git clone https://github.com/Your-Enterprise/your-project.gitThe VS Code Way
- Open VS Code. Click "Clone Repository" on the Welcome page
- Or use the Command Palette (Cmd+Shift+P) and type Git: Clone
- Paste the HTTPS URL. VS Code handles authentication automatically
- Choose a save location, then open the folder
One thing to keep in mind after cloning:
main)
checked out. Other branches exist as remote-tracking branches until you explicitly check them out."Clone the repo at github.com/our-team/project into my projects folder"
"Clone this repository and set up the development environment"
The Core Safety Loop: Your "Save Game" for AI Coding
The diagram above shows the full cycle you'll repeat every time you work with AI-generated code. Let's break it down:
2.1 "What Did the AI Just Do?"
git status is your "heads-up display."
The output shows two categories:
"Changes not staged" (Red)
Files Git tracks that were modified but not yet approved for the next save.
"Untracked files" (Red)
Brand-new files the AI created that Git has never seen before.
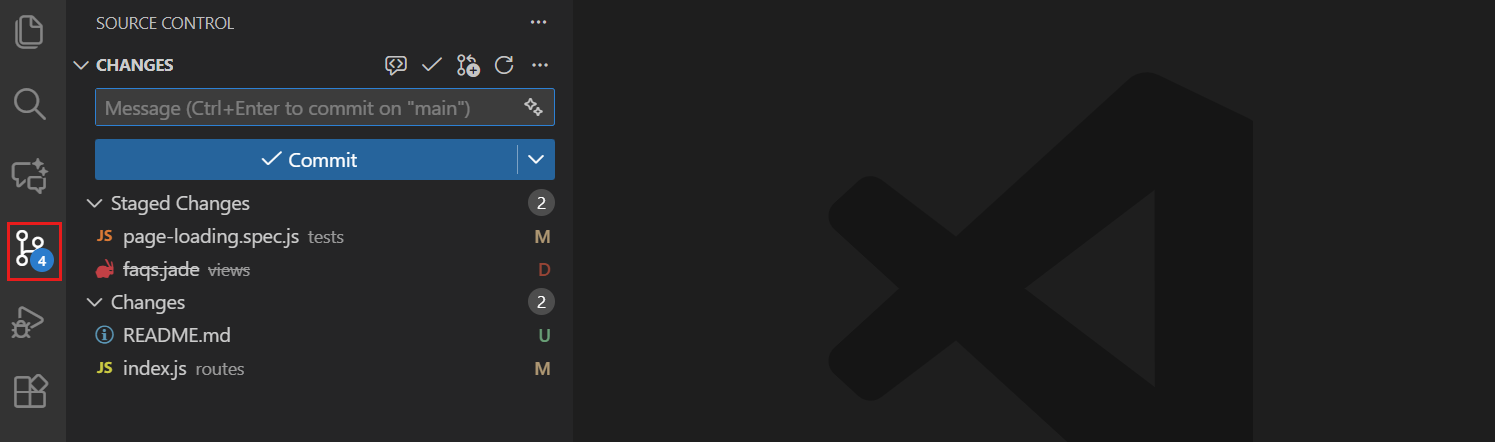
The good news? You don't actually need to type git status in the terminal. VS Code shows you all of this visually. Just click the Source Control icon in the Activity Bar (the branch icon on the left sidebar). The badge shows how many files changed, and each file is labeled M (modified), U (untracked), or D (deleted):
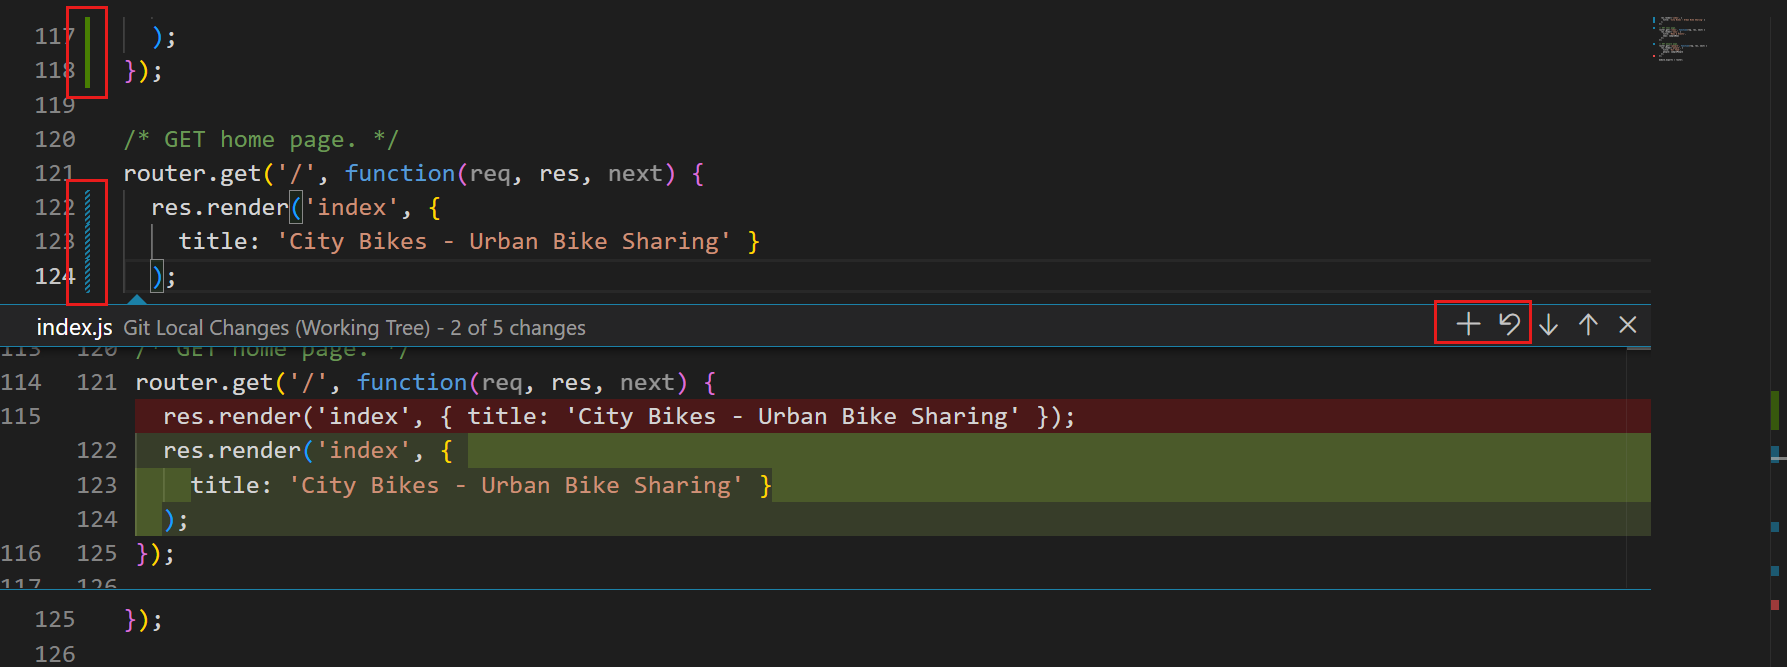
You can also spot changes right in the editor without opening the Source Control panel. VS Code adds colored indicators in the gutter (the narrow strip to the left of your code): green for added lines, blue for modified lines, and a red triangle for deleted lines. Click any indicator to preview the change inline:
"What files did you just change? Show me a summary"
"Check git status and explain what each changed file does"
2.2 Reviewing and Staging the AI's Work
git status shows
the AI changed five files. Blindly trusting this is how bugs are introduced. You must
review every line and then "stage" the changes you approve.Option 1: Stage All (the "trusting" add)
git add .Option 2: Stage One File (the "surgical" add)
git add src/my_file.pyOption 3: Stage Parts of a File (the "AI-first developer's" add)
git add --patch walks you through every individual block of changes ("hunk") interactively.Here's how to start an interactive staging session:
git add --patch # or git add -pFor each hunk, Git asks: y (stage), n (skip), s (split into smaller pieces), q (quit).
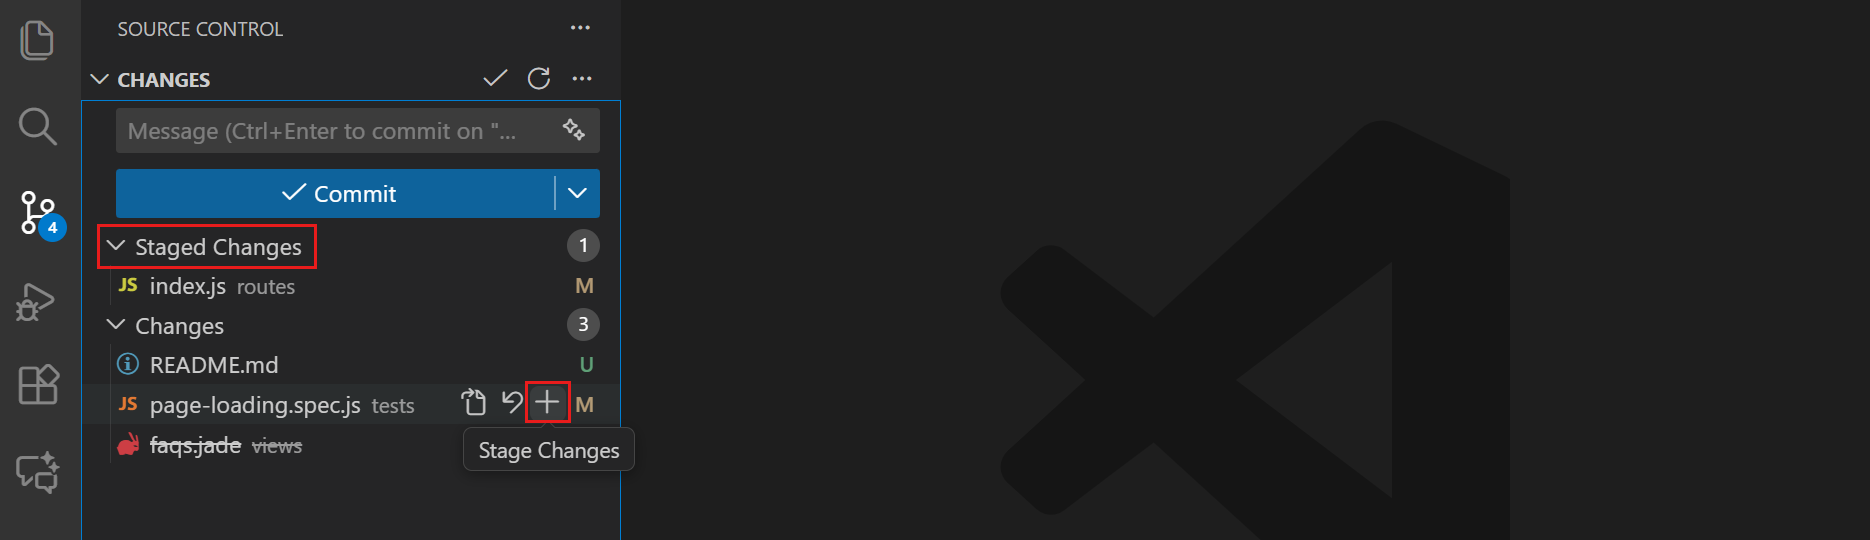
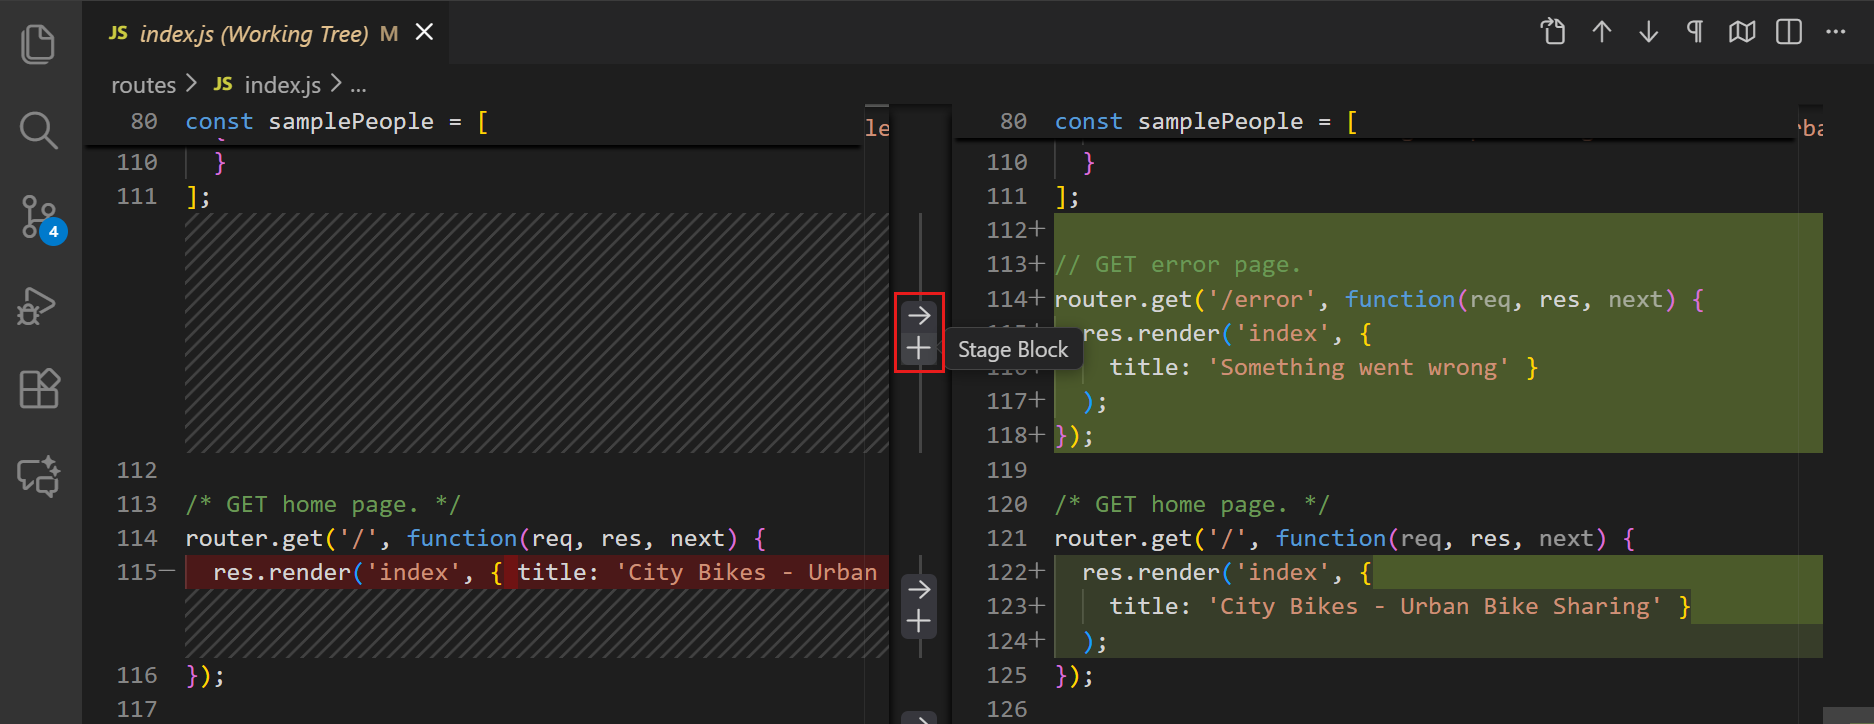
The VS Code Way: Visual Staging
This is where VS Code really shines. Instead of typing cryptic y/n/s/q responses in the terminal, you get a beautiful side-by-side Diff Editor. To stage an entire file, just hover over it and click the + button:
When you click a file in the Changes list, VS Code opens the Diff Editor -- a side-by-side view showing the old version (left) and new version (right). This makes it easy to review exactly what changed before staging:

For even more precision, click a file to open the Diff Editor, then select specific lines and right-click → "Stage Selected Ranges". This is the visual equivalent of git add -p, but far easier to use:
"Stage only the files related to the authentication feature"
"Review the diff of each changed file and stage the ones that look correct"
2.3 Creating the Save Point
git commit -m "feat: Add user authentication endpoint"The command itself is simple, but the message you write matters more than you might think.
| Type | When to Use | Example |
|---|---|---|
feat: | A new feature | feat: Add login button to homepage |
fix: | A bug fix | fix: Resolve dimension mismatch |
refactor: | Code restructuring | refactor: Optimize data query |
docs: | Documentation only | docs: Update API reference |
test: | Adding or fixing tests | test: Add unit tests for auth |
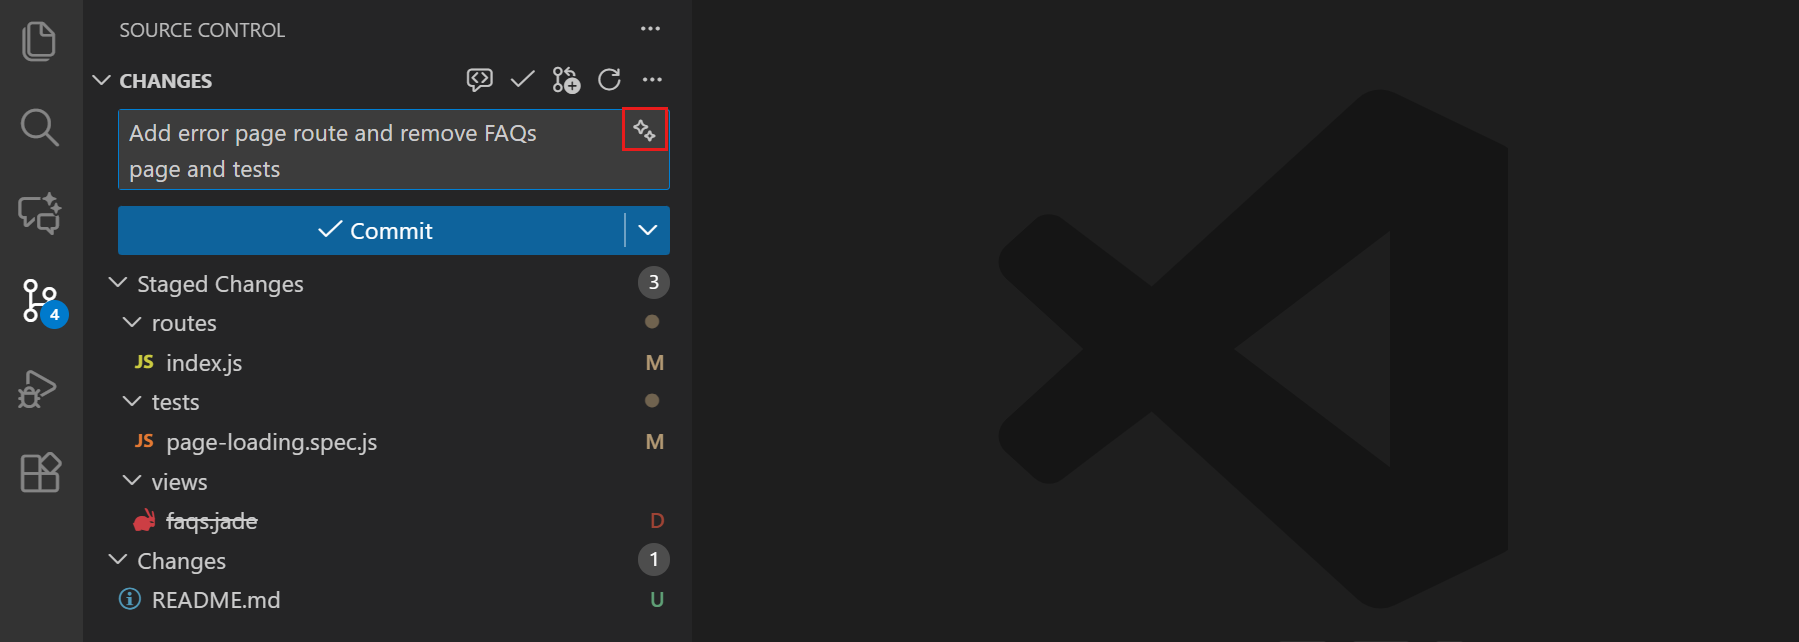
In VS Code, committing is just as simple: type your message in the input box at the top of the Source Control panel and click the Commit button (or press Cmd+Enter). Notice the sparkle icon next to the input -- click it to let AI generate a commit message from your staged changes:
Here's the AI commit message feature in action. After staging your changes, click the sparkle icon and Copilot will analyze your diff and write a descriptive message for you:
Try It: The Complete Loop
# Check what the AI changed
On branch feature/add-auth
Changes not staged for commit:
  (use "git add <file>..." to update what will be committed)

	modified:   src/auth.py
	modified:   src/routes.py
	modified:   tests/test_auth.py

Untracked files:
	new file:   src/middleware.py
"Commit the staged changes with a good conventional commit message"
"Write a descriptive commit message for these changes and commit them"
Parallel Universes: Branching for AI Experiments
main branch.
The main branch represents
the official, stable, production-ready code. Your work must happen in an isolated
"parallel universe" called a branch.3.1 "I Have a New Idea (or AI Prompt)"
First, make sure you're on main and it's up to date. Then create your branch:
git switch -c "feature/my-new-idea"
# Older equivalent: git checkout -b "feature/my-new-idea"
In VS Code, this is even easier. Look at the bottom-left corner of your window -- you'll see the current branch name (e.g., "main"). Click it and you'll get a dropdown where you can switch to existing branches or select "+ Create new branch..." to make a new one:
When you click the branch name, VS Code opens a Quick Pick menu listing all your branches. Select "+ Create new branch..." at the top, type a name like feature/my-new-idea, and you're immediately switched to it:

main.
If the AI destroys everything, it does not matter. Simply discard this branch and switch
back. This workflow enables fearless experimentation."Create a new branch called feature/user-auth and switch to it"
"I need to start working on the payment integration — set up a branch for me"
3.2 "My Teammate Pushed Updates" (Syncing)
main.
Your branch is now "stale."Before diving into the commands, here's how the three main remote operations relate to each other:
Fetch downloads without merging. Pull = fetch + merge. Push uploads your commits.
Option 1: The "Safe" Sync (fetch + merge)
git fetch origin        # Download new commits (doesn't apply them)
git merge origin/main   # Merge the updates into your branch
Option 2: The "Easy" Sync (pull)
git pull origin main # Fetch + merge in one commandgit fetch first
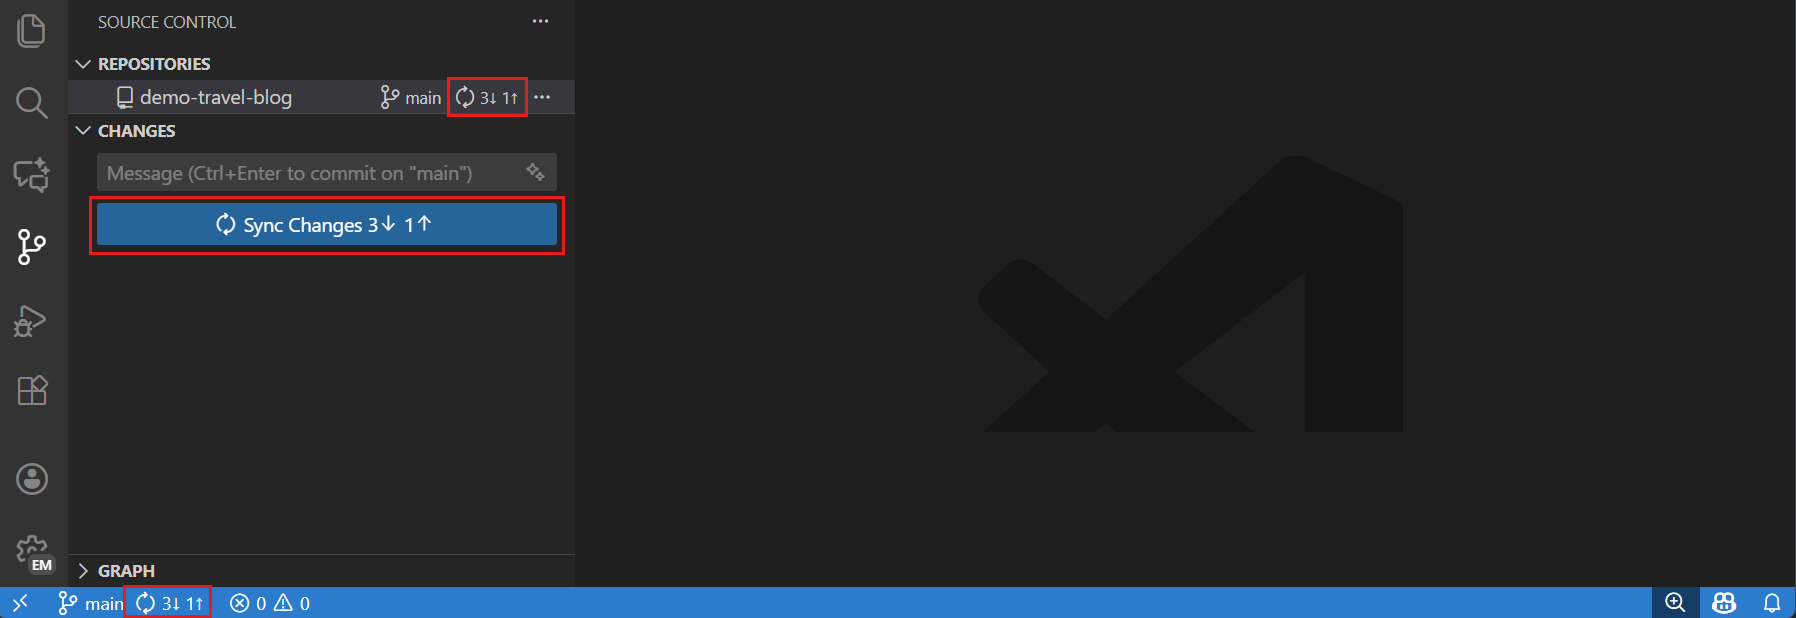
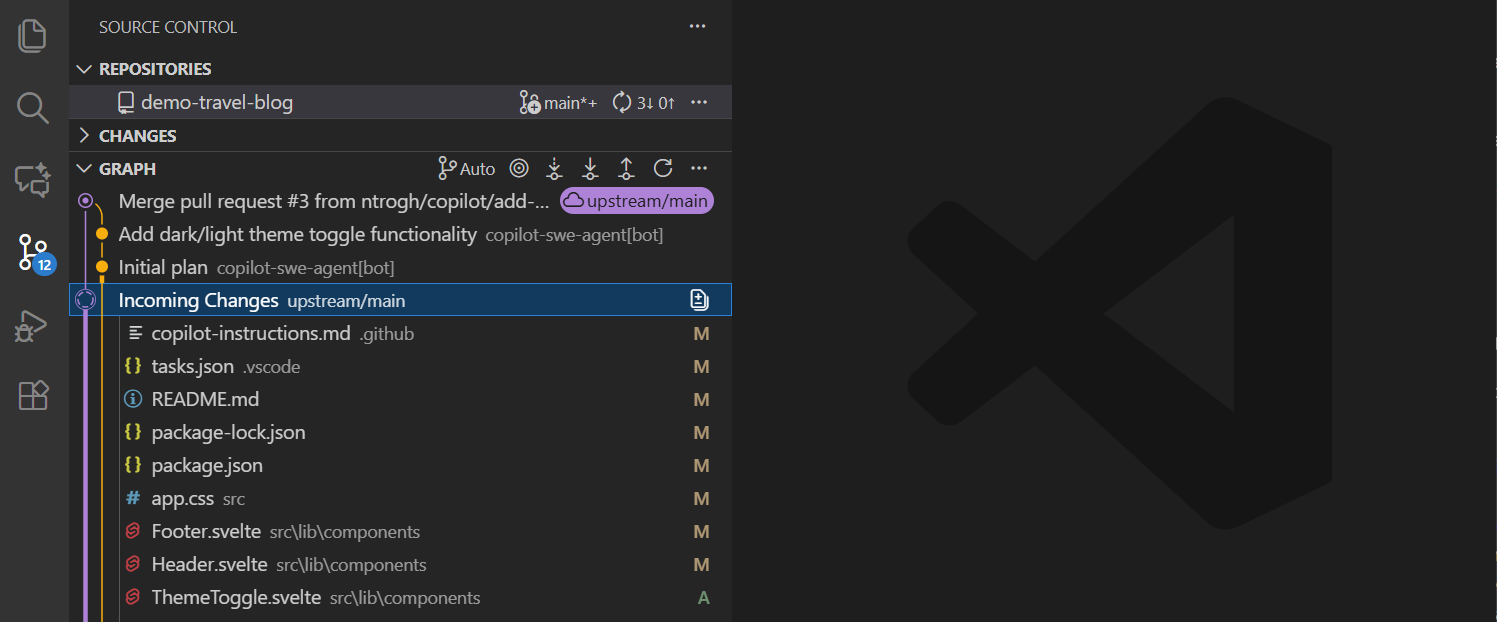
to see what's coming before merging. git pull is just a "black box" shortcut.VS Code makes syncing visual. Look at the status bar at the bottom of your window -- you'll see small arrows with numbers showing how many commits are incoming (to pull) and outgoing (to push). Click the sync icon (circular arrows) to pull and push in one step:

You'll also see a prominent "Sync Changes" button right in the Source Control panel. It shows the exact count of incoming and outgoing commits, so you always know what's about to happen:
"Pull the latest changes from main and update my branch"
"Fetch from origin and tell me if my branch is behind main"
3.3 "My AI-Generated Feature is Ready" (The Pull Request)
main. You do not merge
it directly. You "propose" the change via a Pull Request (PR).Once your feature is ready, push your branch to the remote so your teammates can see it:
git push -u origin feature/my-new-idea
# -u links your local branch to the remote branch
Then on GitHub, you'll see a yellow banner: "feature/my-new-idea had recent pushes. Compare & pull request." Click it to create your PR.
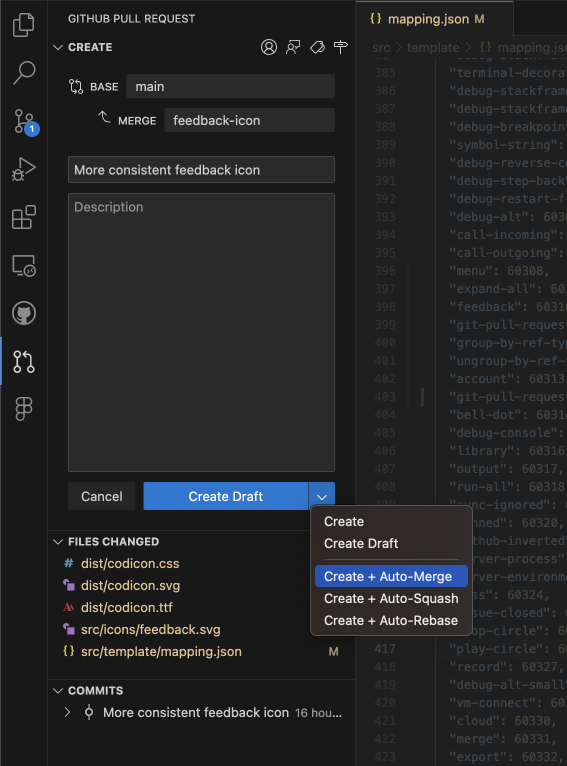
main.Writing a good PR description can feel tedious, but AI tools can help with that too:
You don't even need to leave VS Code to create a PR. Install the GitHub Pull Requests and Issues extension and you can create PRs, review diffs, add comments, approve, and merge -- all without opening your browser:
Try It: Branch, Commit, and Push
# View current state on main
b4d5e6f (HEAD -> main) Stable feature A
a1b2c3d Initial commit
"Push this branch and create a pull request with a good description"
"Create a PR from this branch to main, summarizing all the changes we made"
The "Undo" Toolkit: Reversing AI Mistakes
4.1 "Discard This Mess" (Local, Not Committed)
The fix is simple -- one command wipes the slate clean and takes you back to your last commit:
git restore .              # Discard ALL local changes
git restore src/bad_file.py  # Discard a single file
In VS Code, you don't need the terminal for this. In the Source Control panel, hover over the file you want to discard under "Changes" and click the curved arrow icon. To discard ALL changes at once, click the curved arrow next to the "Changes" header. You can also right-click any file and choose "Discard Changes".
"That last change broke everything — throw it all away and go back to my last commit"
"Discard all the changes you just made, they're not working"
4.2 "I Staged This by Accident" (Staged, Not Committed)
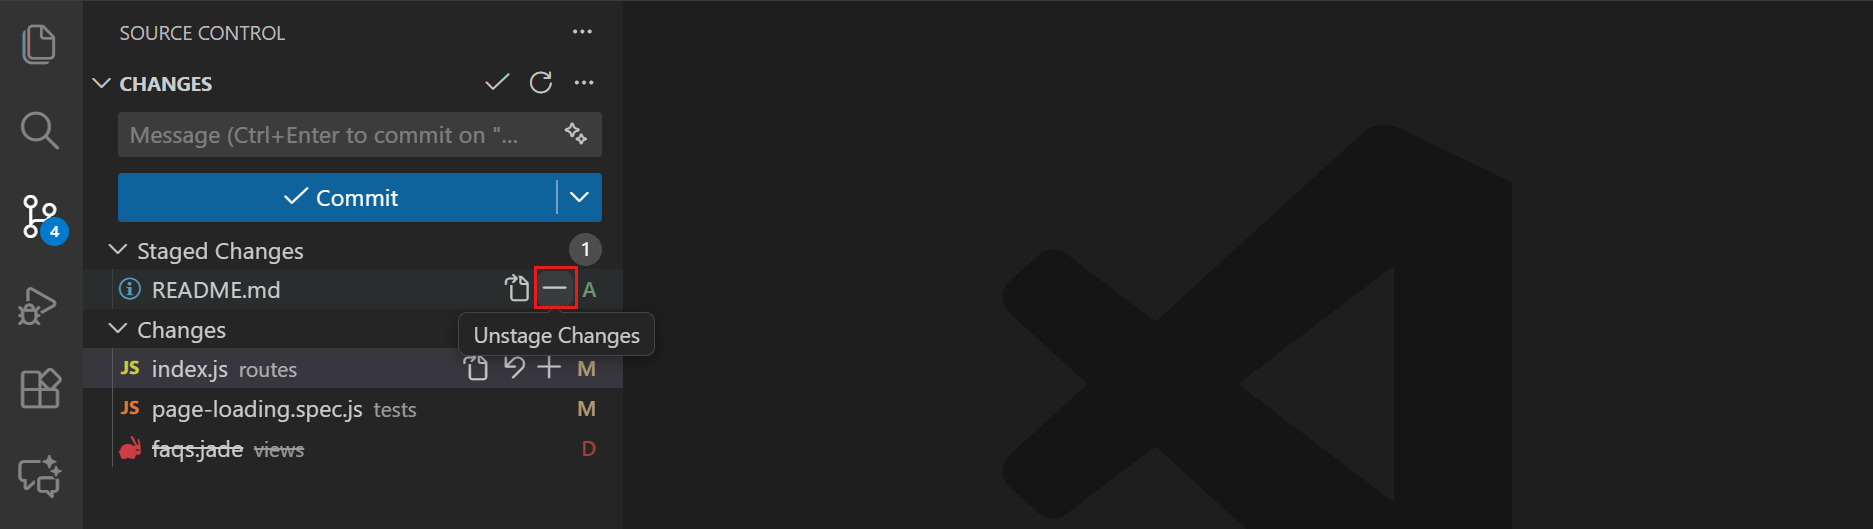
git add . and accidentally staged a file with a bad AI change. You need to "unstage" it.No worries -- unstaging is a safe operation that simply moves a file back out of the staging area:
git restore --staged src/bad_file.py
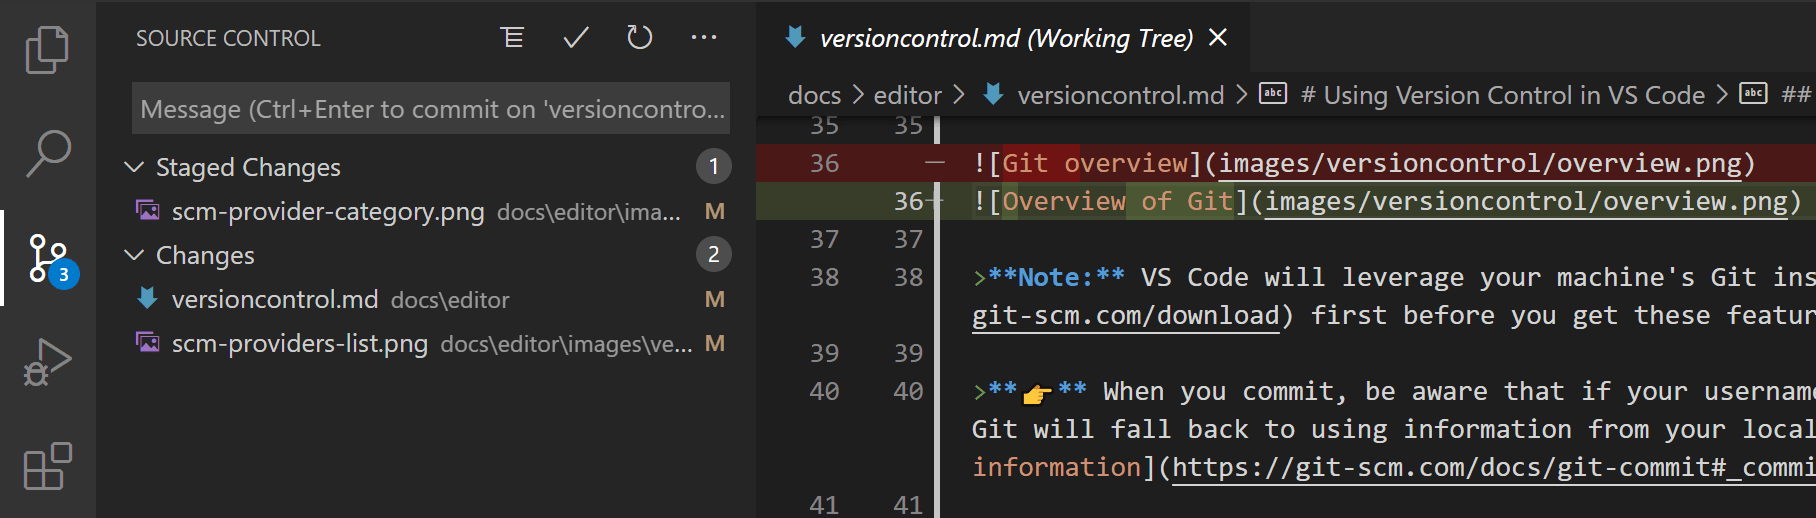
# Older equivalent: git reset HEAD src/bad_file.pyIn VS Code, this is a one-click fix. In the Source Control panel, look under "Staged Changes", hover over the file you want to unstage, and click the − (minus) button. The file moves right back to "Changes":
"Unstage config.py, I don't want that in this commit"
"I accidentally staged everything — unstage all files except auth.py"
4.3 "I Forgot a File in My Last Commit"
Instead of creating a whole new commit, you can tack the missing file onto the one you just made:
git add src/forgotten_file.py   # Stage the missed file
git commit --amend --no-edit     # Add it to the last commit

# Or just fix the message:
git commit --amend
In VS Code, click the dropdown arrow next to the Commit button and select "Commit (Amend)". This adds your newly staged files to the last commit without needing the terminal. You can also find this under the ... menu → Commit → Commit Staged (Amend).
"I forgot to include the test file in my last commit — add it without creating a new commit"
"Fix my last commit message, it should say 'fix' not 'feat'"
4.4 "Nuke This Whole Feature" (Locally, Committed)
This is where the nuclear option comes in. A hard reset rolls your branch back as if those commits never happened:
git reset --hard HEAD~3 # Delete last 3 commits + all changesThe "Safer" Resets
--soft: Keep changes staged
Deletes commits but keeps changes in the Staging Area. Useful for "squashing" commits into one.
--mixed (default): Keep changes unstaged
Deletes commits but keeps changes in the Working Directory (unstaged).
--hard: Destroy everything
Deletes commits AND all code changes. Your files reset to the older commit's state.
git reset rewrites history. Never use this on a branch your teammates have already pulled.
This is for local cleanup only."The last 3 commits were all bad — nuke them but keep the code changes so I can redo it"
"Completely undo my last 2 commits, I want to start fresh from before them"
4.5 "I Pushed a Bug to the Team!" (Public, Pushed)
main.
Your teammates have already pulled it.The WRONG Solution: You cannot use git reset.
It rewrites history that others have, causing repository divergence.
The RIGHT Solution: Create a new commit that undoes the bad commit. This is a revert.
Here's how to create that revert commit in the terminal:
git log --oneline          # Find the hash: a1b2c3d
git revert a1b2c3d         # Create an inverse commit
git push                   # Push the revert
Notice that you're not erasing anything -- you're adding a new commit on top that reverses the damage:
VS Code has this built in too. Open the ... menu in the Source Control panel -- this is your gateway to all advanced Git operations. From here you can access Commit, Changes, Pull, Push, Branch, Stash, and more:
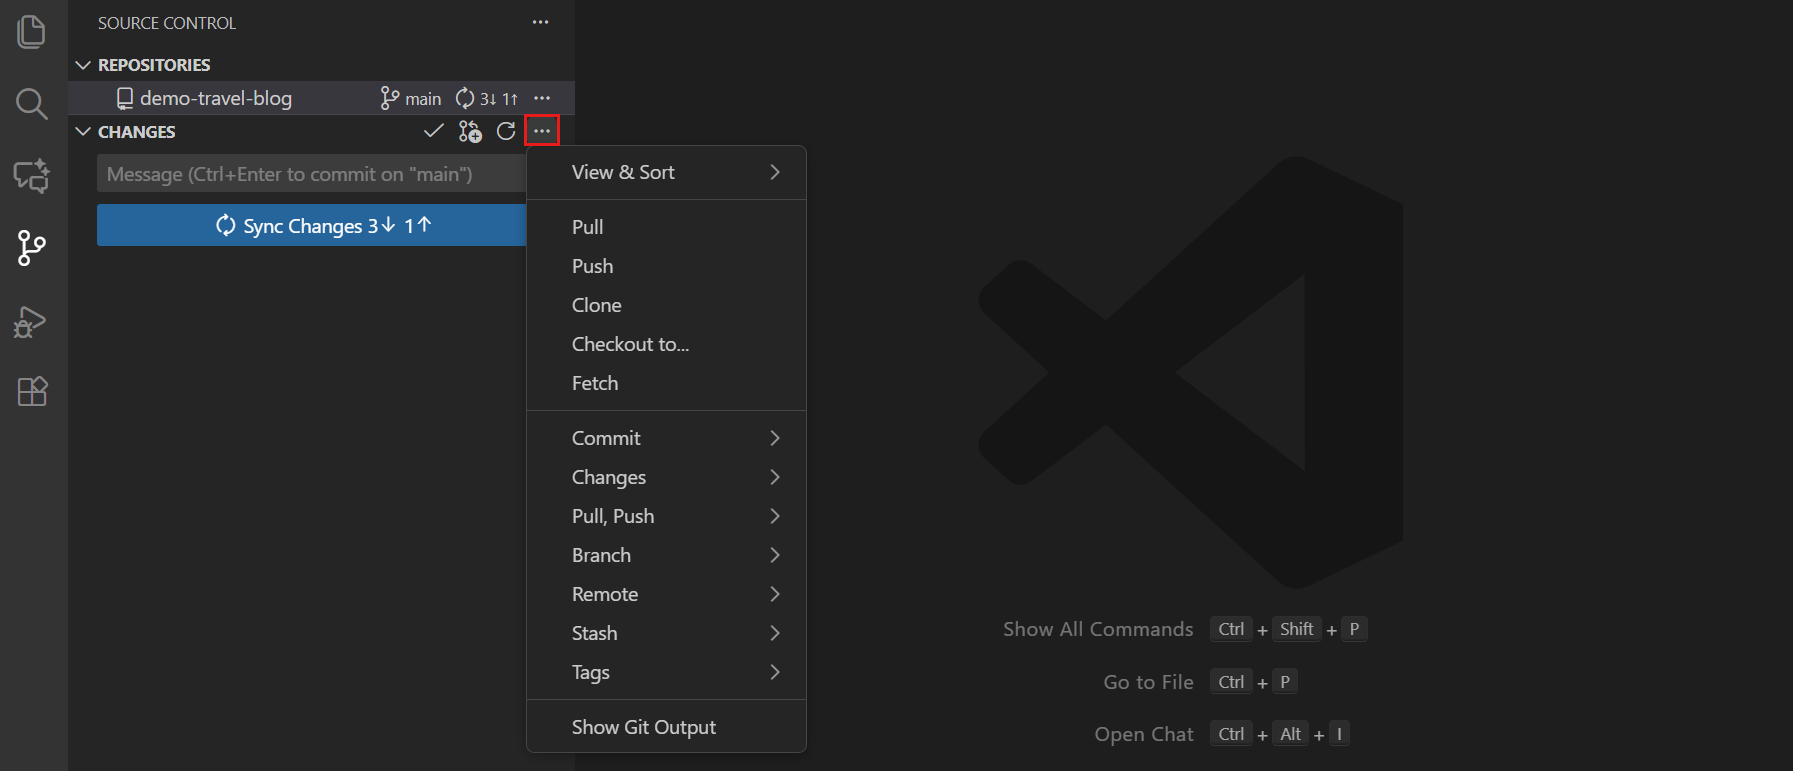
For reverting pushed commits, use the Source Control Graph: right-click any commit and select "Revert Commit" to create the inverse commit safely.
"I pushed a broken commit to main — safely undo it without rewriting history"
"Revert commit a1b2c3d, it introduced a bug in production"
4.6 The "Break Glass" Command
git reset or git commit --amend on a branch you already
pushed. Local and remote history have diverged. Git refuses to let you push.You have two flavors of force push, and picking the right one matters a lot:
git push --force
Replaces the server unconditionally. If a teammate pushed in the last 5 minutes, you permanently destroy their work.
git push --force-with-lease
Conditional force push. Only succeeds if the remote branch hasn't changed since your last fetch. Always use this instead.
4.7 The Git "Undo" Recovery Matrix
Before moving to advanced topics, here's a quick-reference matrix summarizing every undo technique and when to use it:
| Scenario | Command | What It Does | Safe? | VS Code |
|---|---|---|---|---|
| AI's change is bad, not committed | git restore . | Discards all local changes in the working directory | Safe (Local) | Right-click file → "Discard Changes" |
| File staged by accident | git restore --staged <file> | Unstages a file, moving it from Staging back to Changes | Safe (Local) | Right-click staged file → "Unstage Changes" |
| Typo in last commit message | git commit --amend | Edits the message of the most recent commit | Safe (Local) | ... → Commit → Commit (Amend) |
| Forgot a file in last commit | git add <file>git commit --amend --no-edit | Adds new files to the most recent commit | Safe (Local) | Stage files → ... → Commit Staged (Amend) |
| Last 3 local commits are bad | git reset --hard HEAD~3 | Destroys the last 3 commits and all their code changes | Local Only! (Rewrites history) | GitLens → Right-click commit → Reset |
| Pushed a bug to the team | git revert <hash> | Creates a new commit that is the inverse of the bad one | 100% Safe (Public) | GitLens → Right-click commit → "Revert Commit..." |
| Reset a public branch, need to push | git push --force-with-lease | Forcefully overwrites remote, only if no one else pushed | Enterprise "Break Glass" | Terminal only |
Try It: The Undo Toolkit
# AI made a mess of 3 files
On branch feature/experiment
Changes not staged for commit:
	modified:   src/model.py
	modified:   src/utils.py
	modified:   src/config.py
Advanced Scenarios: Managing a Multi-Branch Workflow
5.1 "I Need to Switch Branches, but My Work Isn't Ready"
The stash is a temporary, private holding area for your dirty changes.
# 1. Stash your changes
git stash save "WIP: refactoring pipeline, AI changes"

# 2. Fix the urgent bug
git switch main
git pull
git switch -c "hotfix/urgent-bug"
# ... fix, test, commit, push, create PR ...

# 3. Return to your work
git switch feature/A
git stash pop
git stash pop re-applies
your changes and removes them from the stash. Use git stash apply to keep
the stash entry for reuse.
In VS Code, you can do all of this without memorizing commands. Open the ... menu in the Source Control panel -- you'll see a Stash submenu with all the options you need:
Choose "Stash (Include Untracked)" to save all your work. When you're ready to come back, go to ... → Stash → "Pop Latest Stash" to restore everything exactly where you left off.
Try It: The Stash Workflow
# Working on feature/A with uncommitted changes
On branch feature/A
Changes not staged for commit:
	modified:   src/pipeline.py
	modified:   src/transform.py
	modified:   src/loader.py
"I need to switch branches but I'm not done here — save my work temporarily"
"Stash my current changes, switch to main to fix a bug, then come back and restore them"
5.2 "My Branch is Out of Date" (Rebase vs. Merge)
main has moved on. There are two philosophies for updating it.You have two options for catching up with main, and each tells a different story in your commit history.
git merge main
Creates a new "Merge Commit" on your branch. Preserves the exact history -- messy but 100% accurate.
History: "Worked on feature... merged main... worked on feature..."
git rebase main
"Replays" your commits on top of the latest main. Creates a clean, linear history as if you started today.
History: "A, B, E, F, C', D'" -- all in a straight line.
VS Code supports both approaches. Use the ... menu in Source Control → "Pull (Rebase)" to rebase instead of merge when pulling. For merging, use the Command Palette (Cmd+Shift+P) → "Git: Merge Branch..." and select the branch to merge.
Try It: Merge vs. Rebase
# Your branch is behind main
* f1a2b3c (feature) D - your work
* e5f6a7b (feature) C - your work
| * d4e5f6a (main) F - teammate
| * c3d4e5f (main) E - teammate
|/
* b2c3d4e B - shared history
* a1b2c3d A - shared history
"My branch is behind main — rebase my changes on top of the latest main"
"Update my feature branch with the latest changes from main using rebase"
5.3 "We Both Edited the Same File" (Merge Conflicts)
git pull and Git halts with CONFLICT.
You and a teammate edited the same lines. Git needs you, the human, to resolve it.Don't panic -- conflicts look intimidating at first, but they follow a simple pattern. Git inserts special markers into your file to show you exactly where the disagreement is.
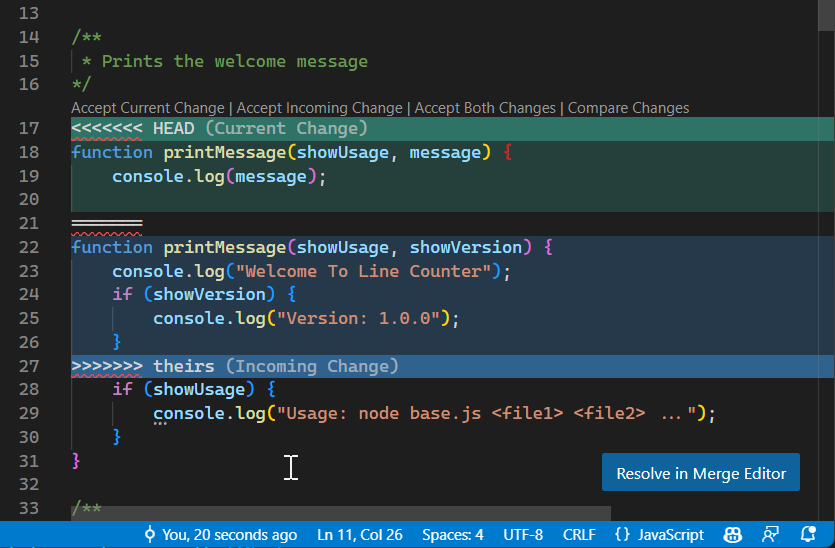
The Conflict Markers
<<<<<<< HEAD
// Your AI's change
const x = 10;
=======
// Your teammate's change
const x = 5;
>>>>>>> origin/main
Delete all the markers (<<<, ===, >>>) and edit the code to
be the correct final version, then stage and commit.
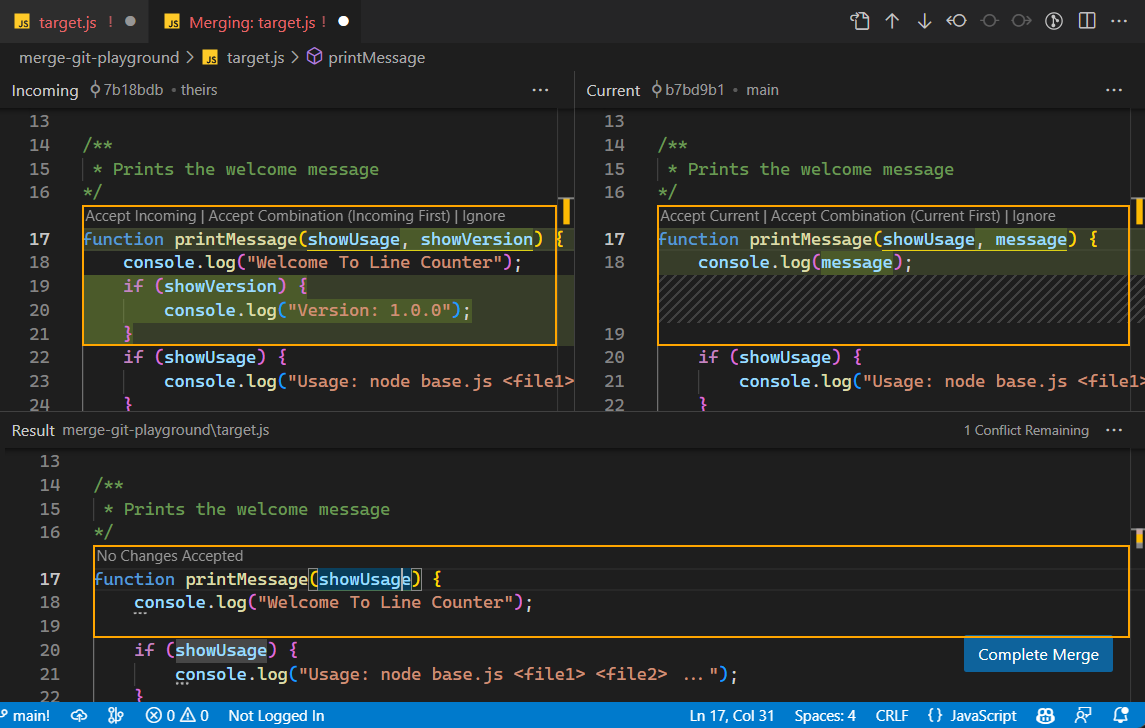
The VS Code Way (The Superior Way)
Editing conflict markers by hand works, but VS Code makes the whole process much more visual and less error-prone.
Left Pane: "Incoming" (teammate's changes)
Right Pane: "Current" (your changes)
Bottom Pane: "Result" (what will be saved)
Above each conflict block, VS Code shows clickable links: "Accept Current" | "Accept Incoming" | "Accept Both".
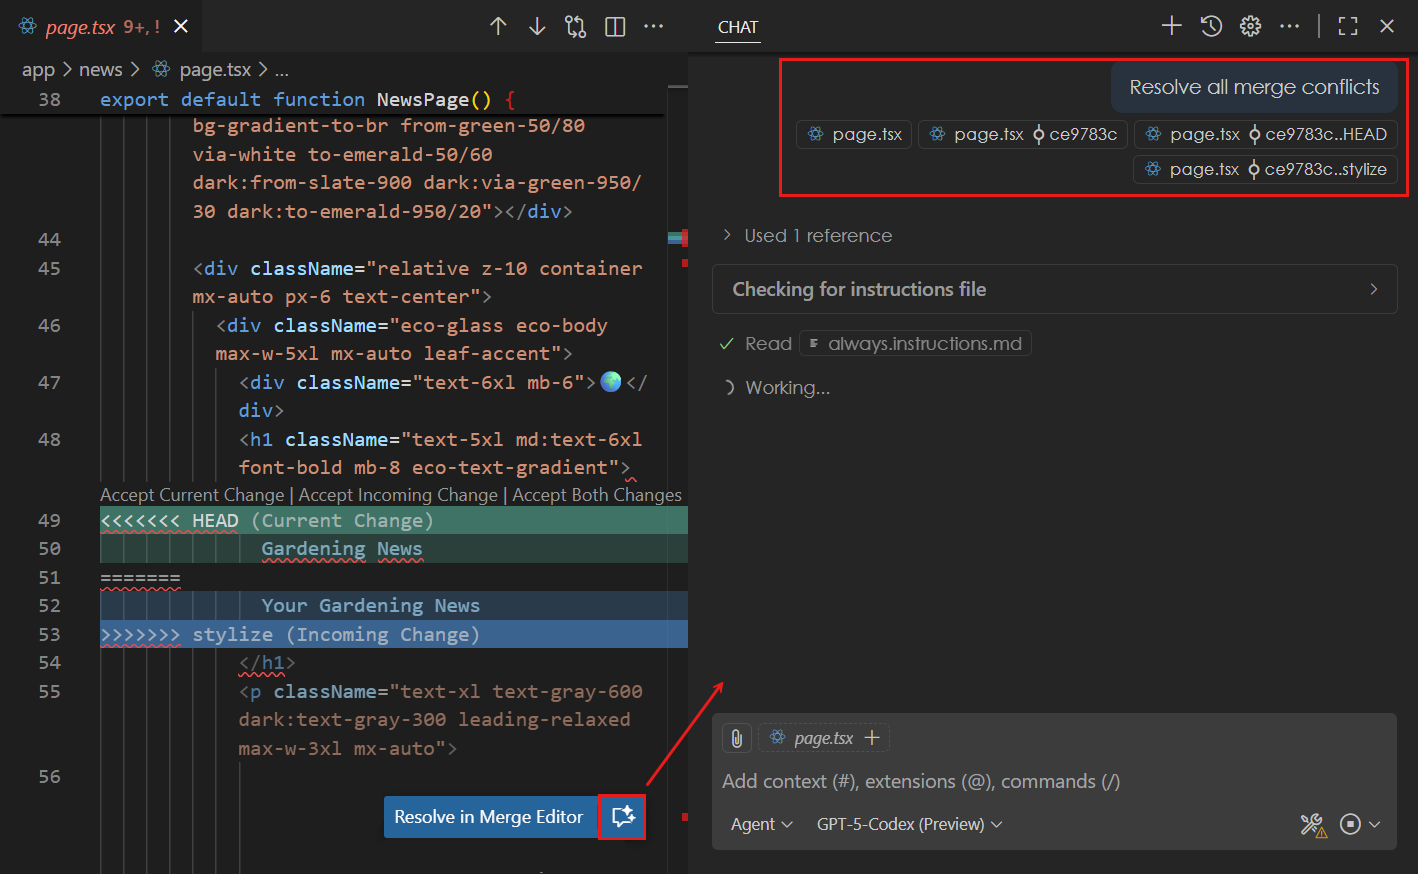
For complex conflicts with multiple overlapping changes, click "Resolve in Merge Editor" to open the full 3-way view. This gives you the most control over the final result:
Try It: Resolving a Merge Conflict
# Pulling triggers a conflict
Auto-merging src/model.py
CONFLICT (content): Merge conflict in src/model.py
Automatic merge failed; fix conflicts and then commit the result.
"I have a merge conflict in model.py — help me resolve it, keeping both changes"
"Show me the conflicts and suggest the best resolution for each one"
Your AI-Assisted Cockpit: Mastering Git in VS Code
VS Code bundles a rich set of Git tools right into the editor, so you can do almost everything without opening a terminal.
6.1 The Source Control View
This is your command center. Everything you've learned maps directly to the UI:
Changes
Your working directory (git status).
Modified and untracked files appear here.
Staged Changes
Your staging area. Files you've approved for the next commit.
Commit Box
Your git commit -m "...". Type the message
and click the checkmark.
... Menu
All advanced commands: Pull, Push, Stash, Commit (Amend), Branch, Revert, and more.
Here's what it looks like in action. Press Ctrl+Shift+G (or Cmd+Shift+G on Mac) to open the Source Control panel from anywhere:
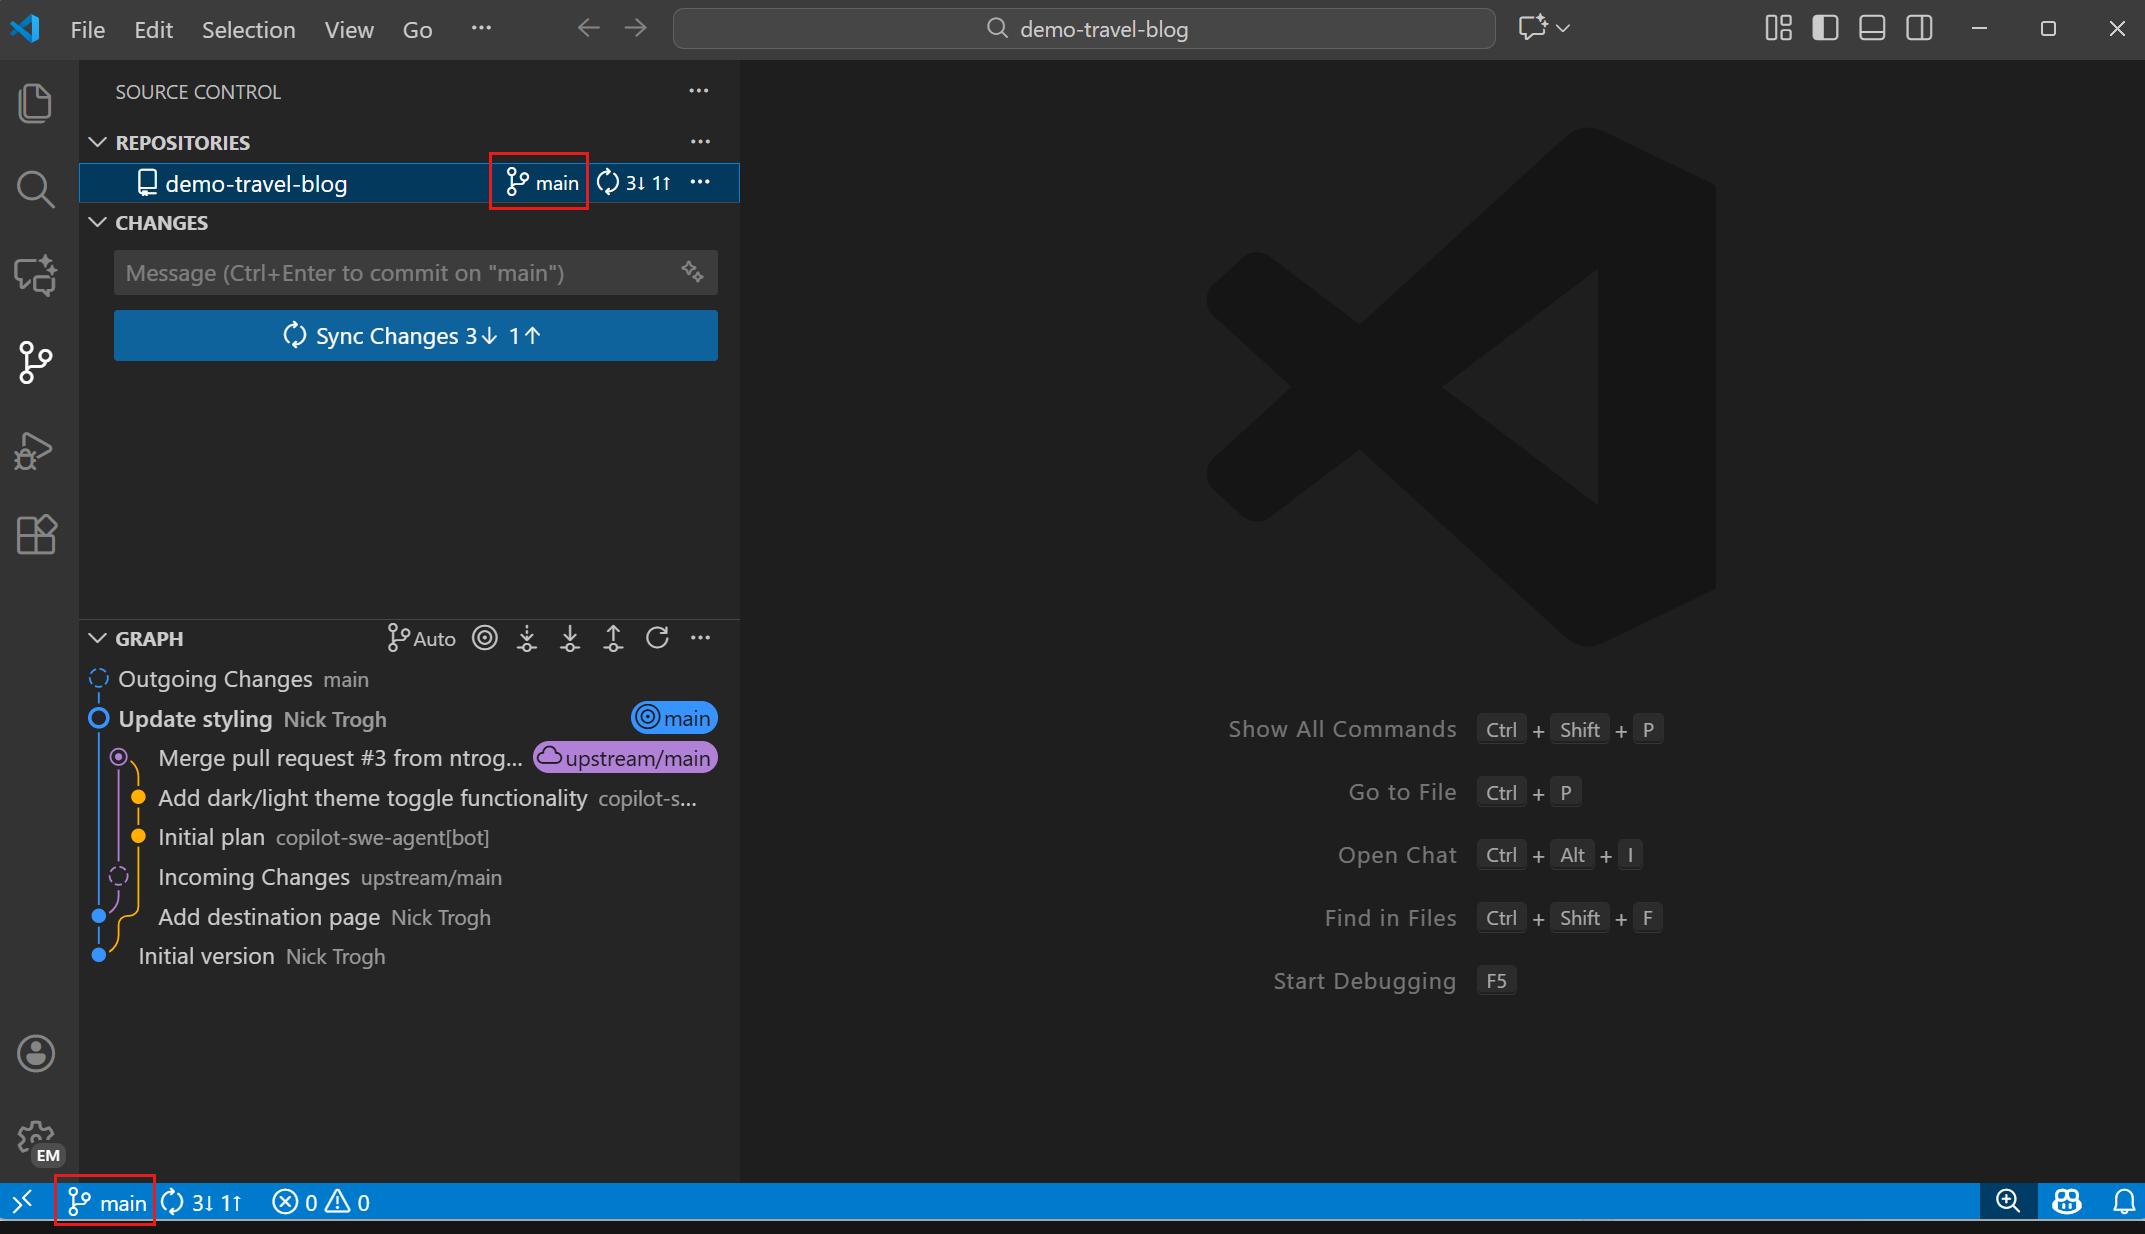
Below the commit area, you'll find the Source Control Graph -- a visual representation of your commit history and branch structure. This is incredibly helpful for understanding how branches relate to each other:
6.2 The Timeline View & GitLens
Open any file, then look in the Explorer panel for the "Timeline" pane at the bottom. This shows the complete commit history for that specific file. Click any commit to see a diff, or right-click and select "Restore."
Here's the Timeline in action. Each entry represents a commit that touched this file -- click any entry to see exactly what changed in that commit:

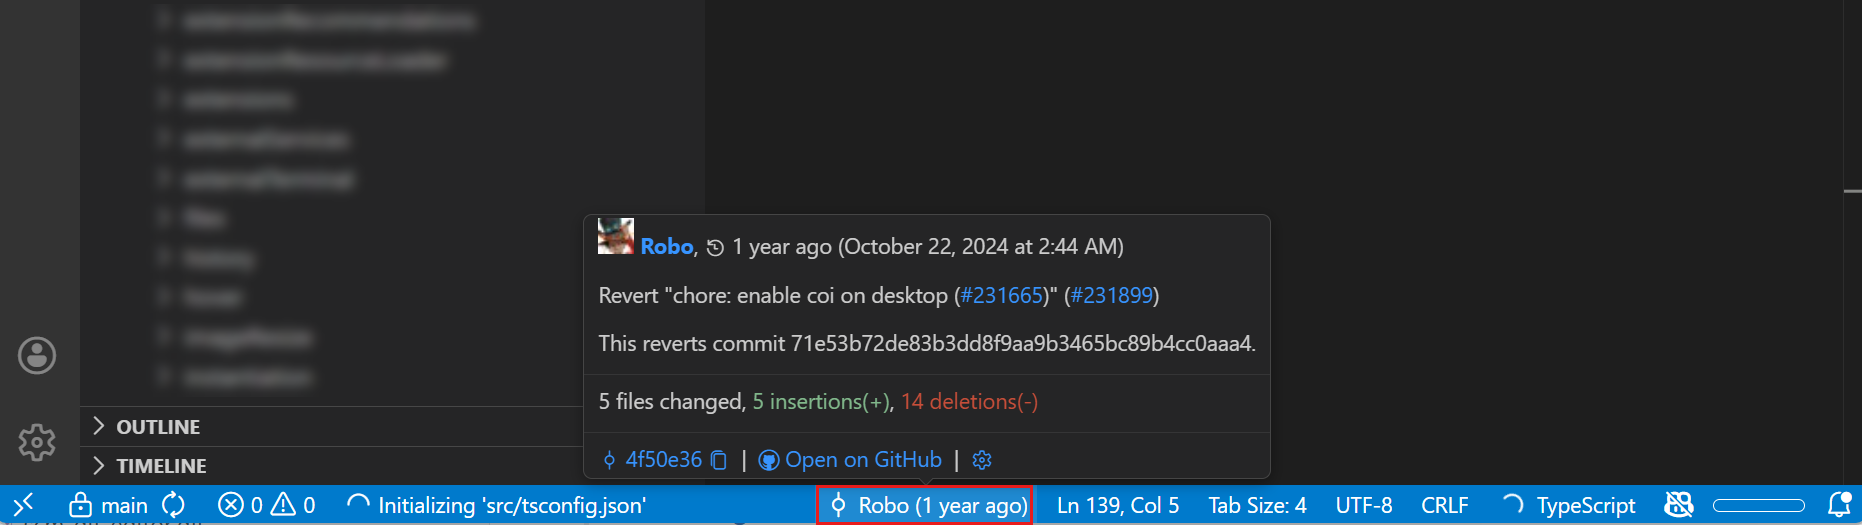
VS Code also has built-in Git Blame. Hover over any line of code and you'll see who changed it and when, right in the status bar. For even richer inline annotations on every single line, install the GitLens extension from the VS Code Marketplace -- it's practically essential for professional work:
6.3 The 3-Way Merge Editor
We touched on merge conflicts earlier -- now let's look at the tool that makes resolving them almost enjoyable.
When a conflict occurs, VS Code highlights the conflicting files. Clicking one opens the 3-way editor with three panes:
Here's the merge editor in action. Use the checkboxes next to each change to select which version you want to keep -- or manually edit the Result pane at the bottom for a custom resolution:
And if you have GitHub Copilot installed, there's an even easier option. VS Code can use AI to analyze both sides of a conflict and suggest an intelligent resolution. Look for the "Resolve with AI" option in the merge editor:
Conclusion: Best Practices for AI-Augmented Teams
7.1 The AI-First Workflow (Summary)
This is your new "save game" loop. Follow these 8 steps for every piece of work:
Here's what each step looks like in practice, along with the commands you'll use.
Sandbox
git switch -c ai-experiment/new-feature
Generate
"Vibe" with your AI assistant and prompt it to generate code.
Review
Use git add -p or VS Code "Stage Selected Ranges" to review every line.
Save
git commit -m "feat: <message>" -- Commit small, commit often.
Sync
git fetch origin followed by git rebase origin/main.
Push
git push --force-with-lease if you rebased. Updates remote safely.
Propose
Create a Pull Request for human review.
Recover
If you push a mistake, never reset a public branch. Always use git revert.
7.2 Quick Reference Card
Keep this handy. It covers the most common Git tasks with both the terminal command and the VS Code equivalent, so you can use whichever feels more natural.
| Task | Command | VS Code |
|---|---|---|
| Check what changed | git status | Source Control panel |
| Stage specific lines | git add -p | Stage Selected Ranges |
| Commit changes | git commit -m "feat: ..." | Type message + checkmark |
| Create new branch | git switch -c feature/name | Click branch name (bottom-left) |
| Discard local changes | git restore . | Discard Changes |
| Undo last commit (keep) | git reset --soft HEAD~1 | GitLens: Reset |
| Revert public commit | git revert <hash> | Revert Commit |
| Stash work in progress | git stash save "message" | ... menu: Stash |
| Update branch | git fetch && git rebase origin/main | ... menu: Pull, Rebase |
| Safe force push | git push --force-with-lease | Terminal only |